
Product rules are conditions which automatically add rewards (in the form of products, discounts and discounted products) to a customer's cart after they add a specified trigger product to their cart.
In this article, we'll explain how to create your first product rule.
Step 1: Create Your Rule
From the Shopify Admin, navigate to the apps page and then to the EG home screen.
Click the "Create Rule" button, and give your new rule an appropriate name.
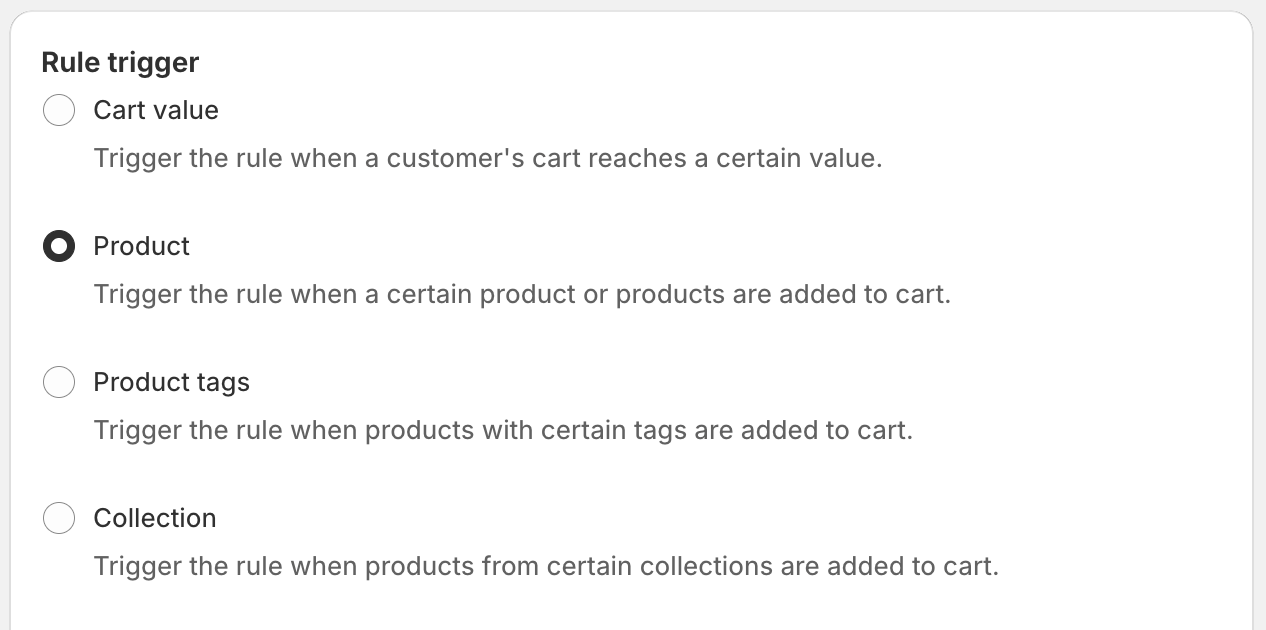
Step 2: Set Your Rule Type
Your rule type sets what type of trigger you want to use. Select "Product" from the options.
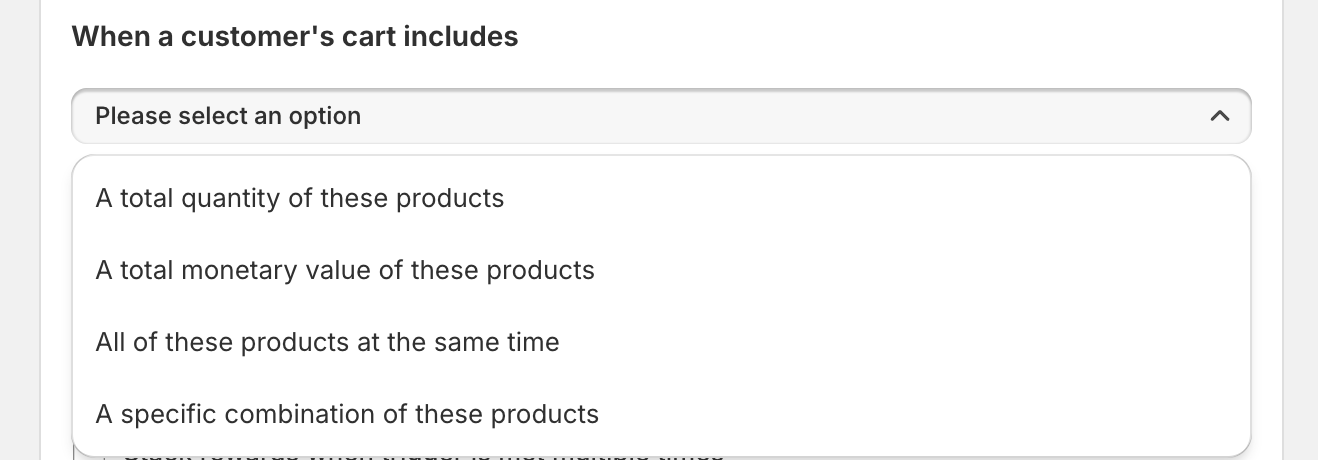
Step 3: Select which sub-condition you want the product rule to trigger on
You have the granular ability to decide what exact product condition you want the rule to trigger on, with these options:
A total amount of these products, for example, 2 items in total, which could be apples, bananas, or a mix of both.
A total monetary value of these products – for example, $50 worth of apples, bananas, or a combination of both added to the cart.
All of these products are simultaneously – for example, both an apple and a banana are in the cart at the same time.
A specific combination of these products – for example, 3 apples and 2 bananas in the cart.
Step 4: Choose Your Trigger Products
Press the "Choose products" button to select your trigger product or products.
After you have checked the correct trigger products, click the "Add" button.
Step 5: Rule Trigger Options
Remove added products when trigger conditions are no longer met - if enabled, this setting automatically removes the reward product from the cart when the rule conditions are no longer met.
Stack rewards when trigger is met multiple times - this setting controls the number of times the offer rule can be triggered. If enabled, there is the option to select a Maximum trigger limit to specify the exact number of times the rule can be applied to an order.
Only execute the rule once per session - enabling this setting means the trigger can only be fired once per visitor session. Even if the conditions are met subsequently, the rule will not activate unless the browser cookies are cleared.
Step 6: Set Your Rule Action
Here, you can choose the action that the trigger will create. At the moment, this is limited to adding products to the cart, but more options are coming soon!
Next, choose the product(s) you would like to be automatically added to the cart when the rule is triggered. The reward product needs to be enabled for sale on your online store in Shopify, and must be in stock.

Generally, we recommend only choosing a single product variant; otherwise, all variants will be added to the cart.
You can also select the quantity of the product to be added here.
You can select a product that has a zero price, and we can use the settings below to protect it from excessive ordering by customers.
Step 7: Rule Action Options
Lock added item quantity in cart. You should enable this setting if you are using EG to add a deposit, service charge, or other product that customers should not be able to remove from the cart.
Prevent customers from adding the action products outside of the rule. If you are adding a zero-priced product to a customer's cart, then we recommend you enable this setting to protect the zero-priced product from abuse. When enabled, customers won't be able to add, remove or adjust the quantity of the item in the cart. (Please note, this feature has been tested extensively; however, we cannot give a 100% guarantee, especially with non-approved themes)
Step 8: Choose Notification Options
EG can show a small notification to the customer when the reward is given. You can customize this message using your own image, text and choose where it appears in the window.
Step 9: Choose Whether To Discount Your Reward
Choose one of three options:
Do not apply any discounts. This is useful if you are rewarding the customers with a zero-priced product in your store.
Apply a discount using an EG automatic discount. To make a reward free or discounted, you need to set up an EG Automatic Discount from the Discount section, after you have finished configuring the EG rule trigger and action.
Apply a discount using a Shopify promo code. This option will automatically apply a promo code when the trigger is fired. Enter the promo code you have already configured in Shopify or a new one you plan to create. This option works well for free shipping and other similar code-based offers. However, the promo discount will often only be applied on the Checkout page, and a customer will not see the reduction in price on the Cart page. As a result, we recommend using a Shopify automated discount.
Step 10: Schedule
EG rules can now be scheduled to run for a chosen period of time. Select either the run this rule continuously option or set up a start and end date for your rule.
Step 11: Save Your Rule
Remember to press save at the bottom to save your rule!
Rule not working properly? Contact support here.